Configuring and Using Apple Mail
This page will help you configure Apple Mail as your email client. Since Apple Mail uses a separate address book and calendar, you are strongly encouraged to use Outlook 2011 as your email client.
If you do not currently use Apple Mail with another email address, follow the directions below. If you are already an Apple Mail user, skip to the directions for viewing multiple accounts.
Initial Email Setup
This information is the same for all Mac users, however, users who have updated to OS X Lion (during or after July 2011) will see slightly different images than those below.
- Open the program "Mail" from the Applications folder.
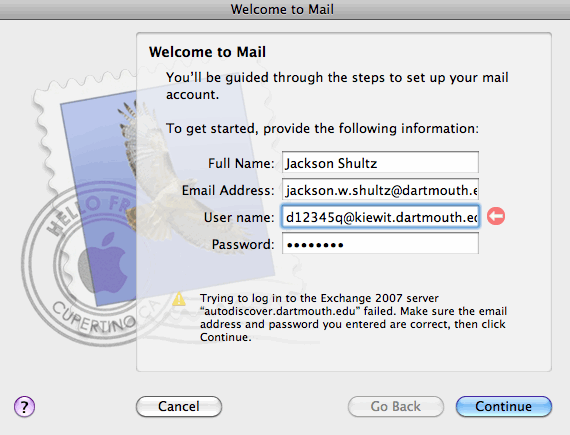
- Enter your full name, as shown to others.
- Enter your full email address. (This will be either firstname.lastname@dartmouth.edu or firstname.middleinitial.lastname@dartmouth.edu, based on how your name appears on your Dartmouth ID card).
- Enter your password and click "Continue."
- This will automatically try to log in to your email and load your settings. It will fail to work. Do not worry, this is normal.
- In the same window, enter yournetID@kiewit.dartmouth.edu (e.g., d12345t@kiewit.dartmouth.edu) in the "User name" field and click "Continue."
- You should see a summary of your account. Make sure the boxes to sync your "Address Book contacts" and "iCal calendars" are checked and click "Create." You should see your email account in the Mail application.
- If you open the iCal and Address Book applications, they should now load your calendars and contacts automatically.
Tutorials
If you need assistance learning how to use any of the functions of Apple Mail you can follow these simple tutorials:
Viewing Multiple Accounts
If you already use Apple Mail for another email address, you can choose to view multiple email accounts within one inbox. To do this follow the instructions below:
- With the Mail application open, go to the "Mail" menu and select "Preferences."
- In the bottom-left corner, click on the "+" sign.
- Enter your full name, as shown to others.
- Enter your full email address. (This will be either firstname.lastname@dartmouth.edu or firstname.middleinitial.lastname@dartmouth.edu, based on how your name appears on your Dartmouth ID card).
- Enter your password and click "Continue."
- This will automatically try to log in to your email and load your settings. It will fail to work. Do not worry, this is normal.
- In the same window, enter yournetID@kiewit.dartmouth.edu (e.g., d12345t@kiewit.dartmouth.edu) in the "User name" field and click "Continue."
- You should see a summary of your account. Make sure the boxes to sync your "Address Book contacts" and "iCal calendars" are checked and click "Create." You should see your email account in the Mail application.
- If you open the iCal and Address Book applications, they should now load your calendars and contacts automatically.
Warning: If you are adding a second email address to Apple Mail, make sure you are not currently logged into the account elsewhere during set-up (e.g., on another computer or a mobile device). This can possibly cause errors and will definitely make everything extremely slow.
