Outlook on the Web
This section is designed to help you use the webmail version of Outlook during the initial time after the migration. Please use this guide for help until a separate email client is configured or for general use of the BWA in case you need email access while away from your primary computer. If you would like to learn more about other details of BWA, please click here.
After successfully logging into your Blitz cloud-based account, you will arrive at the BWA main page. Navigate to the Outlook "Inbox".

BWA Email
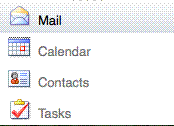
Once you have arrived at the Inbox, you will see three different areas on the webpage. On the left is a Navigation section that will list folders like "Inbox," "Sent Items," and "Drafts". An important area to note within the Navigation pane is on the bottom-left of the page that lists the four different parts of the BWA called "Mail", "Calendar", "Contacts" and "Tasks". Use this to navigate to the different areas of BWA.
While within the Mail section, clicking on any of the folders like "Inbox" or "Sent Items" will bring you to the messages contained within each folder and they will be displayed in the middle section of the page. You can also watch a video tutorial to help you learn the nuances of your new email.
By default the messages will be displayed using a method called Conversation View that is different from older Blitzmail clients. At 2:00 minutes into this video is a description of Conversation view. Note: this video is NOT for BWA, but may help since it describes the similarly designed Outlook 2010 client.
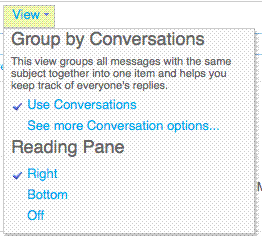
Disable the Conversations View Option in BWA
From the Outlook main Inbox, locate the blue "View" link that appears above "Search Entire Mailbox" at the top of the page. By clicking on this you will be shown options for Conversations displays. Click the option called "Use Conversations" to turn this display mode off. This should rearrange your messages into chronological order and remove the checkmark next to "Use Conversations" if you click on the "View" link again. You can also watch a video tutorial that explains conversation mode in greater detail.
Creating, Sending and Deleting Messages
Create a New Message
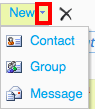
From any of the folders listed in the Navigation pane, locate the blue "New" link at the top of the page above "Search Entire Mailbox". By clicking on the small triangle to the right of the word "New," you will have the option of selecting "Message" or "Meeting Request". Select "Message" to have a new message window appear. Unless you are in your Calendar or Contacts (described later), you may also simply click on the "New" link once and it will automatically create a new message window. You can also watch a video tutorial to help you learn how to create a new message.
Address a Message
There are several features to BWA that will help you address your new message. By beginning to type a name in the "To..." or "CC..." field, there will be automatic suggestions for Contacts that you currently have email from in one of your folders.
There are two separate ways to send a new message to someone who you do not currently have an email from:
- By entering the beginning of a Contact's name in either of the "To..." or "CC..." fields, you can then click on the small icon at the top of the new message window that is a human-figure with a checkmark next to it (fifth from the left). This "Check Names" option will then provide a list of possible addresses that you can select from directly within the new message window and it will automatically fill in the rest of the Contact's information in the desired field.
- By clicking on the blue "To..." link to the left of the address field, you will be brought to the Dartmouth Global Address list in a new window. This contains a directory of all Dartmouth community members and resources. Search this list for the address you want by typing in the search bar with the small magnifying glass icon located at the top-middle of the new window and pressing enter. Clicking once on the desired Contact will display their information on the right side of the window. Double-clicking on the desired Contact will insert their address in the "To..." field located at the bottom of the Address list window. Click "OK" in the bottom-right corner to return to the new message window with the address automatically entered. This can also be done for the "CC..." field in the same way. You may also reach the Global Address list by clicking on the book icon that is the fourth from the left near the blue "Send" link at the top of the new message window. Unless you reach the Global Address list by clicking on either the blue "To..." or "CC..." links, double clicking on a Contact will create a brand new message window and will not automatically enter into an existing message window.
Send a Message
Simply press the blue "Send" link located in the top-left corner of all new message, reply/reply all and forwarding windows.
Delete a Message
To delete a message, click on the message to highlight it and press the delete button. You can also watch a video tutorial to help you learn how to delete messages and folders.
![]()
Replying and Forwarding
![]()
Reply to a Message
If you click just once on the message and are viewing it on the right side of the main Mail page, you should see a single purple arrow next to the name of the message's sender. Click this and a new window will appear for your reply.
If you double-click on any message and it appears in its own window, there will be a blue "Reply" link on the top-left of the window. Click this and you can begin typing your reply. You can also watch a video tutorial to help you learn how to reply to an email.
Reply All to a Message
If you click just once on the message and are viewing it on the right side of the main Mail page, you should see a double purple arrow next to the name of the message's sender. Click this and a new window will appear for you to reply to all Contacts included in the original message.
If you double-click on any message and it appears in its own window, there will be a blue "Reply All" link on the top-left of the window. Click this and you can begin typing your reply to all Contacts included in the original message.
Forward a Message
If you click just once on the message and are viewing it on the right side of the main Mail page, you should see a blue arrow next to the name of the message's sender. Click this and a new window will appear for you to forward the message to another contact. See Addressing a Message for instructions on how to find a Contact's address.
If you double-click on any message and it appears in its own window, there will be a blue "Forward" link on the top-left of the window. Click this and you can address the received message to the contact you would like it forwarded to. See Addressing a Message for instructions on how to find a Contact's address.
Adding and Saving Attachments
Adding an Attachment/Enclosure to a Message
In any new message, reply/reply all, or forwarding message, locate the blue "Send" link in the top-left of the message window and click on the paperclip icon (second from the left). This will prompt you to locate the file you want enclosed in the message. Once you have selected the attachment you want, the name will appear in the "Attached:" field beneath the "Subject:" once it has been completely uploaded to the message. You can also watch a video tutorial to help you learn about sending attachments.
Saving an Attachment/Enclosure to your Computer
If you have clicked just once on a message and are viewing it on the right side of the main Mail page, or if you have double-clicked on the message and opened it in a new window, you should see any attached files next to "Attachments:" underneath the name of the message's sender and names of people who received the message. By clicking on the name of the attachment (in blue), it should automatically begin downloading to your computer. You may also click on the blue link to "Open in Browser" if you wish to view the attachment without downloading it.
Creating Automatic Replies and Signatures
Creating an Automatic Signature for Emails
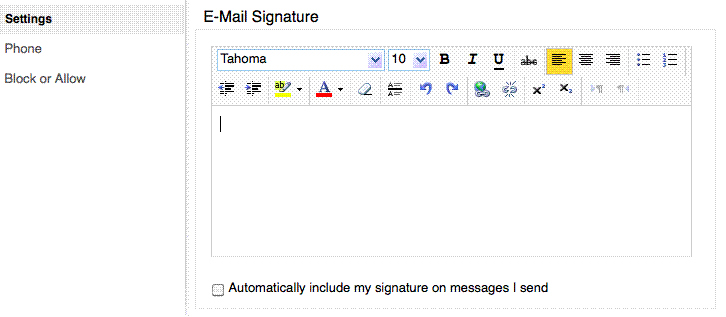
While looking at the main Mail page, click on the "Options" link beneath your name in the top-right corner of the page. Select "See All Options". Once you are on the Options page, there will be a column on the left side of different subsections. Select the "Settings" option and you will see the "E-mail Signature" section appear. Type in your automatic signature in the text box and then check the "Automatically include my signature on messages I send" box beneath it. Then press the "Save" button that has a green checkmark next to it in the bottom-right corner of the page. You can also watch a video tutorial to help you learn how to create an automatic signature.
Creating an Automatic Reply
While looking at the main Mail page, click on the "Options" link beneath your name in the top-right corner of the page. Select "See All Options". Once you are on the Options page, there will be a column on the left side of different subsections. Select the "Organize E-mail" option. At the top of the page, click on the "Automatic Replies" option that is the second icon from the left that looks like a door with a blue arrow.

To turn on the automatic reply function, select "Send automatic replies". This will indefinitely reply to any email sent to you automatically. If you would like to have automatic replies on for only a specific amount of time, select a starting date and time and then an ending date and time after checking the "Send automatic replies only during this time period:" box. Enter in the reply you would like sent automatically in the text box. Then press the "Save" button that has a green checkmark next to it in the bottom-right corner of the page. You can also watch a video tutorial to help you learn how to create an automatic reply.

*Note: If you uncheck the option "Send automatic reply messages to senders outside my organization", the automatic reply will be sent ONLY to addresses ending in @dartmouth.edu (e.g., @hitchcock.org will NOT receive automatic replies).
Creating and Using Folders
Folders allow you to organize your messages. To create a new folder, right-click in the left-hand column of your email. Next select "Create New Folder" from the menu that appears. You can now type a name for your folder. You can also watch a video tutorial to help you learn more about using folders.
Read any Message in a Folder
After clicking on the desired folder in the Navigation section, such as "Inbox", you can select a message in the middle section by clicking on it once and view it on the right side of the page. You may also double-click on any message and have it appear in a new window.
Delete a Folder
If you wish to delete a folder, simply right-click on the folder and select "Delete" from the menu that appears. You can also watch a video tutorial to help you learn more about deleting folders and messages.
Contacts
Clicking on the Contacts option in bottom of the Navigation pane on the left of the Outlook main page will bring you to your Contacts manager. From here you may create new contacts, modify current contacts and build groups and mailing lists.
![]()
Create a New Contact
In the middle of the top of the page, above the "Search Contacts" search bar, there is the blue "New" link. Clicking on this will automatically create a new window that will allow you to enter in various details for your contact. The first section called "Profile" is where you can enter basic information about who the contact is.
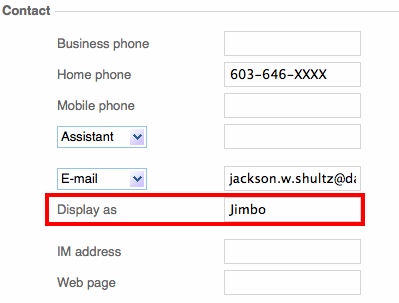
The following "Contact" section is where you enter the actual contact information. This may include multiple phone numbers and email addresses. To add a second or third email address to one contact, simply click on the drop-down menu that says "E-mail" and select either "E-mail2" or "E-mail3" and type in the different address.
To have your new contact saved with a nickname, enter in the name you would like to type instead of the full address in the "Display As" field. Once you have done this, you may type the nickname in the "To" or other fields in a message window and click on the "Check Names" icon (human-figure with the checkmark) to have Outlook automatically insert the contact's nickname and full email. (Note: you must have a full email address above the "Display As" field for this to work.)
The "Address" section is primarily for the contact's physical address and information. Below this in the "Details" section is an area called "Notes" where you may add any further information you want included in the contact.
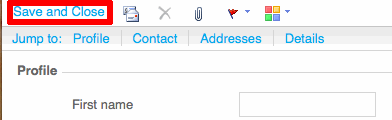
Once you have added all the information desired to a new contact, press the blue "Save and Close" link in the top-left of the new contact window.
Edit an Existing Contact
Once you have located the desired contact from within your list of contacts, simply double-clicking on it will cause their information to appear in a new window. Highlighting a contact and pressing, "Enter" on the keyboard can also do this. You may then edit their information just like creating a new contact and press the same, blue "Save and Close" link in the top-left corner of the window when finished.
Create a Contact Group (Mailing List)
When viewing the main Contact page of BWA, locate the blue, "New" link above the "Search Contacts" search bar. Click on the small triangle on the right side of "New" to see an options menu. Select "Group" to have a new contacts group window appear.
Once the window pops up, enter in the name you would like the contact group to be called in the "Group Name" field at the top. Then enter in a full email address to the "Members" field and press the blue "Add to Group" link on the right side of the window. You will see the name and email address of the contact added to the field below and you may repeat this as many times as you like.
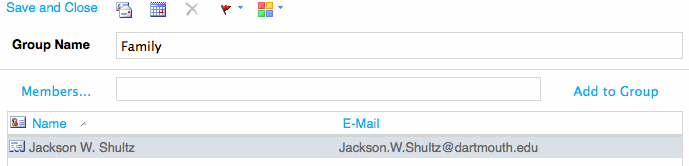
If you want to add a contact, but are unsure of their specific email address, click on the blue "Members" link itself. This will automatically open up the Global Address List and you may search for the desired contact. Double-click on the contact you want and it will be entered in the "Members" text field at the bottom of the Global Address List window. Press the blue "Ok" link in the bottom right of the window to automatically insert the contact's name and address in the "Members" field and then press "Add to Group". Once you have added all contacts to the contact group, press the blue "Save and Close" link in the top-right corner of the window and you will see it added to your Contacts page. You can distinguish between individual and group contact entries by the small icon next to the contact group's name that looks like small human faces in a row.
Edit a Contact Group
By double-clicking on a contact group, or pressing, "Enter" when you have the group highlighted, you will return to the contact group's information in a new window. You may remove someone from the contact group by selecting their name and address in the list of members and pressing the blue "Remove from Group" link near the bottom-right corner of the new window.
BWA Calendar
To view your meetings, events or appointments, click on the "Calendar" option in the bottom-left of the page in the Navigation section. This should bring you to a page that displays the entire month in the top of the Navigation section and the current date in the middle section. You can change the middle section's display options from a single day to the work-week, whole-week or whole-month views. To do this, click on the small calendar icons that are at the top of the middle section near the blue "New", "Delete" and "Go to Today" links. You can also watch a video tutorial to help you learn the nuances of your new calendar.
Creating a Calendar Event
While on the main Calendar page, you can create new events in two ways. You can double click anywhere in the middle section of the Calendar page and a new Appointment window will appear. You may also click on the blue "New" link in the top-left of the page. Clicking on the "New" link will automatically create a new Appointment while viewing your Calendar (as apposed to a new Message while viewing your Mail). You may also click on the small triangle next to the "New" link to select between "Appointment" and "Meeting Request" ("Message" will create a new email).
Appointments Vs. Meeting Request
The two event options are very similar. Creating an Appointment will by default only be viewable on your personal Calendar, but you may invite other Contacts to it after it is created. A Meeting Request will automatically invite the Contacts you include when the event is made in your Calendar. You can also watch a video tutorial to help you learn about creating meetings.
Appointments
After the new Appointment window appears, you will see there are several different areas you can enter information for the event. The "Subject" field will be the name of the event, the "Location:" field will indicate where it takes place and the text box at the bottom of the event window can include a larger description or more details. Similarly, you will be able to choose what date or time the event occurs and if you would like a reminder notification sent.
If you have chosen to create an Appointment and have finished entering all the information, you can save the event into your personal Calendar by pressing the blue "Save and Close" link in the top-left corner. Notice that you may attach files to the Appointment using the same paperclip icon (next to "Save and Close") as in a Mail message.
If you have created an Appointment, but would like to change it to a Meeting Request in order to invite other Contacts to add it to their Calendars, click the small calendar icon at the top of the Appointment window (fourth from the left of the "Save and Close" link). Clicking on this will shift the Appointment to a Meeting Request.
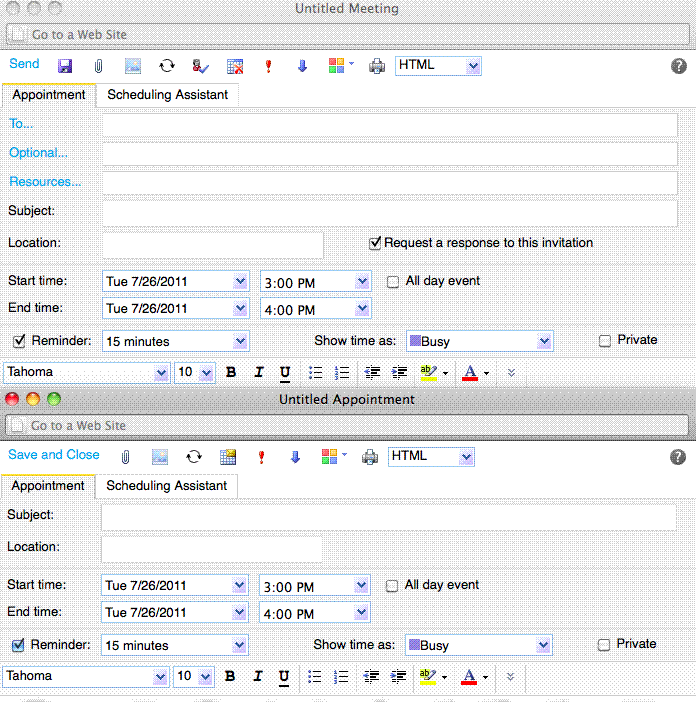
Meeting Request
The only major difference between the Appointment event window and the Meeting Request window is that the Meeting Request window will have the fields "To...", "Optional..." and "Resources..." above the "Subject:" and "Location:" fields. These are basically the same as the "To..." and "CC..." type-fields in a Mail message.
Once you have entered in all the information and Contacts for the Meeting Request and would like to add it to your calendar, press the blue "Send" link in the top-left corner of the Meeting Request window. When you click this, it will automatically send a request to the Contacts you included asking them to add the Meeting to their Calendars, as well as adding the Meeting to your personal Calendar.
Notice that next to the blue "Send" link in the top-left corner of the window there are the same icons for adding attachments (paperclip, second from the left) and doing the "Check Names" function (human-figure, fifth from the left) as when composing a Mail message.